Building Multithreaded Message Relay Service (Rust)
In this tutorial I will explain the working and building from sctrach a asynchronous message relay service in Rust using Tokio. Client can connect with websockets to the server for realtime updates.
Written by Aditya Rawat on February 28th, 2024
Table of Content
What is webSockets ?
- WebSocket is an advanced API that allows two way-communication between the client’s and server. This allows the server to communicate with clients in realtime without forcing the client to poll the server for updates.
Why we are choosing rust for constructing websockets
- Rust is Blazing Fast and efficient resource usage
- It is Memory Safe because of the concept of
Ownershipsystem and strict compile time helps to prevent some common bugs, such as null pointer dereferences and buffer overflows. - Can easily scale to handle thousands of simultaneous connections due to its lightweight threads. (this is why it is best fit for real-time applications where we want to support multiple users.)
What is message relay service and where we use them in practical world
- A message relay service serves as way to pass messages between two parties ensuring that the messages reach their intended recipients b acting as a middleman.
- This type of service is essential in situations where direct communication between parties not possible or convenient because of varying network protocols the necessity.
- More you can read on internet We are going to focus on building it in rust from scratch.
- Before moving on let me tell you some real world example of message relay service, Which enhance you curiosity how things work.
Real-World Use Cases:
- SMTP Relay Service like SendGrid, Mail gun and Amazon SES : This marketing companies use these services to send transactional and marketing emails reliably.
- Twilio : They uses SMS relay service to send notifications, alerts and OTPs to users. These services handle the delivery across different carriers and ensure message delivery even if the user is in different country.
- Firebase Cloud Messaging and Apple Push Notification Service : Mobile and web application use to send real-time notifications to users device. The relay service ensure that notifications are delivered even if the app is not actively running.
- Last But not least as you all know about the Message Brokers like (Apache Kafka, RabbitMQ) They are built on top of Message relay services.
- I think all the above example increases your
Project Setup
We will use Cargo Workspaces Read more about cargo workspace. So later on you can easily scale this code or can you built your project on top of this.
#!/bin/sh
mkdir {{project-name}}
cd {{project-name}}
touch Cargo.toml
You have to edit the initial Cargo.toml to add workspace member
member = ["msg-relay-server"]
resolver = "2" # https://doc.rust-lang.org/edition-guide/rust-2021/default-cargo-resolver.html
#!/bin/sh
# cargo new {{project_name}} Let suppose we named 'relay-server'
cargo new relay-serverAt Final the initial Project Structure looks like
├── Cargo.lock
├── Cargo.toml
├── relay-server
│   ├── Cargo.toml
│   └── src
│       └── main.rs
Later we will crate separate modules to keep the code clean and more readable
Architecture of the Message relay service
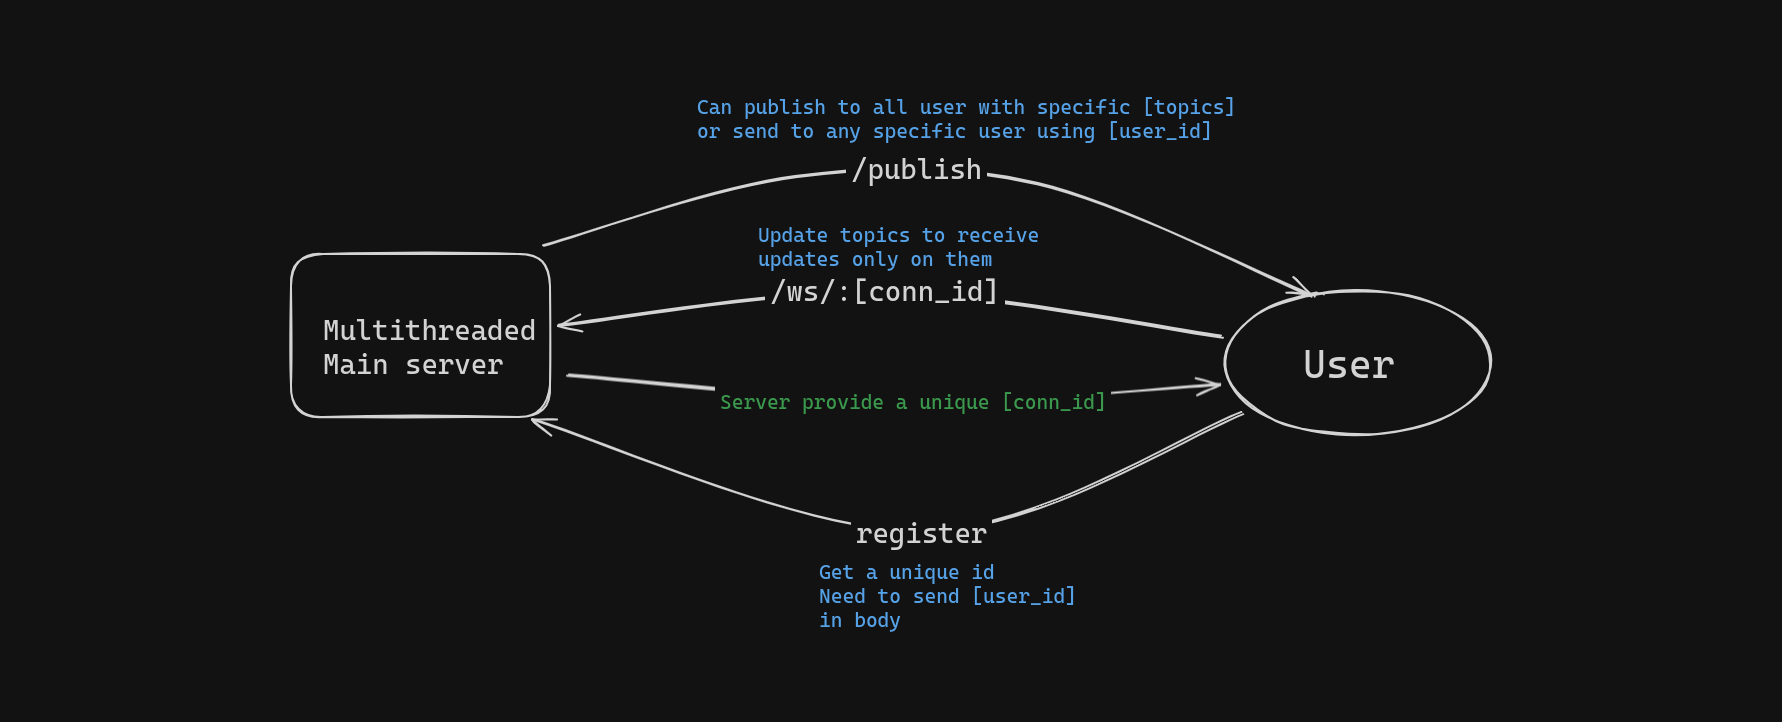
Now, we will discuss about the architecture of the relay server.
The architecture looks similar to client-server architecture. The only difference is client is connected with WebSockets instead of polling the server to receive the updates. Will Explain you the API Structure of the Project first.
GET /health: Tell if the server is Up or not.POST /register: Registers new client in the application and returns a uniqueconnection_id- Request Body:
- Required:
user_id DELETE /register/:{connection_id}: Unregisters the client with their uniqueconnection_id.POST /publish: Broadcasts an event(desired message) to clients.
Add the dependencies of the project to Cargo.toml with their respective features.
axum = { version = "0.7.5", features = ["macros", "ws"] }
serde = { version = "1.0.201", features = ["derive"] }
serde_json = "1.0.117"
tokio = { version = "1.37.0", features = ["full"] }
tokio-stream = "0.1.15"
uuid = { version = "1.8.0", features = ["serde", "v4"] }
futures = { version = "0.3", default-features = false }
tower-http = { version = "0.5.2", features = ["cors"] }
We need axum, tokio and tower-http to run the web server asynchronously and serde_json to serialize and deserialize JSON. The uuid will be used to create unique connection IDs and futures crate will be helpful when dealing with the asynchronous data stream of the websockets.
Understanding the data-structure
Before we get started, let's look at some of the data Structure we'll use to get some more context. First of all the Client is at the core of this application. Here' what it looks like:
pub struct Client {
    pub user_id: usize,
    pub topics: Vec<String>,
    pub sender: Option<mpsc::UnboundedSender<std::result::Result<Message, axum::Error>>>,
}
There is a difference between User and Client in this application. A user can have multiple clients - think of the same user connecting to API using mobile as well as Computer, Clients have a user_id, a list of topics they're interested in and s sender. This sender is a part of MPSC (multiple producers, single consumer) channel. The sender will be used to send messages to the Connected Client via WebSockets.
The following data structures are used in the REST API to register users and broadcasts events:
#[derive(Deserialize, Debug)]
pub struct RegisterRequest {
    user_id: usize,
}

#[derive(Serialize, Clone)]
pub struct RegisterResponse {
    url: String,
}

#[derive(serde::Deserialize, serde::Serialize)]
pub struct Event {
    topic: String,
    user_id: Option<usize>,
    message: String,
}

#[derive(serde::Deserialize, serde::Serialize)]
pub struct TopicsRequest {
    topics: Vec<String>,
}
we need a ways for clients to communicate the topics they're interested in. If they don't set the topics explicilty, they'll be default to tech - because who doesn't love tech ?
Getting the server up and running
#[tokio::main]
async fn main() {
    let cors = CorsLayer::new()
        .allow_methods([Method::GET, Method::POST])
        .allow_origin(Any);

    let app = Router::new()
        .route("/health", get(handlers::health_handler))
        .route("/publish", post(handlers::publish_handler))
        .nest(
            "/register",
            Router::new()
                .route("/", post(handlers::register_handler))
                .route("/:param", delete(handlers::unregister_handler)),
        )
        .route("/ws/:id", get(handlers::ws_handler))
        .with_state(AppState::default().clone())
        .layer(cors);

    let tcp_listener = TcpListener::bind("127.0.0.1:8000")
        .await
        .expect("Address should be free and valid");
    axum::serve(tcp_listener, app)
        .await
        .expect("Error serving application")
}
That's quite a bit of code. Let's go through it step by step. As mentioned above, we want clients to connect via WebSockets to our service. To accommodate this, we need a way to keep track of these clients within the service. We can solve this in many ways, but in this case, we'll use with_state provided by axum to share data to a specific router. However, because this AppState of clients need to be accessed and mutated by several actors throughout the system(e.g., registering new clients, sending messages, updating topics, and more), we need to ensure it can be safely passed around between threads and avoid data race.
That's why the Clients types are the first thing we defined above - an Arc<Mutex<HashMap<String, Client>>>. This type may look scary, but essentially, we want the map of connection IDs for clients behind a RwLock so a single writer can only mutate it and multiple reader can concurrently read them so Our Application can maintain its efficiency and we can also safely pass it to other threads, we wrap it into an Arc, an atomic smart pointer type that provides shared ownership by keeping a count of readers.
The with_state filter is used to shared the clients in these routes. Besides, all handlers (except the WebSockets one) are pretty basic. For the /ws route, the axum::ws and axum::websocketUpgrade filter is used, which make it possible to upgrade the connection to a WebSocket connection in the handler.
The routes are combined into router with CORS support provided by tower-http, and the server is started on port 8000
Registering Clients
Now that the server is set up, let's look at the handlers for the routes defined above, starting with client registration. To make the code a bit nicer to read. let's put the handlers into a different fiel called handler.rs. Let's start with registering a new client, where a JSON body with user_id is sent to the service, like so:
pub async fn register_handler(
    State(state): State<AppState>,
    body: axum::extract::Json<RegisterRequest>,
) -> impl IntoResponse {
    let user_id = body.user_id;
    let uuid = Uuid::new_v4().simple().to_string();
    println!("Client {:?} Connected: {:?}", user_id, uuid);
    register_client(uuid.clone(), user_id, state).await;
    Json(RegisterResponse {
        url: format!("ws://127.0.0.1:8000/ws/{}", uuid),
    })
}

async fn register_client(id: String, user_id: usize, state: AppState) {
    state.clients.write().unwrap().insert(
        id,
        Client {
            user_id,
            topics: vec![String::from("tech")],
            sender: None,
        },
    );
}
The process of registering a new client is simple. First, a new uuid is created. This ID creates a new Client with empty sender, the user's ID, and default topic. These are simply added to the clint's data structure, returing a WebSocket URL with the uuid to the user. The user can connect the client via WebSockets with this URL.
To add the newly created client to the shared client structure, we need to write() the RwLock. Since we're using tokio's asynchronous RwLock in this case, this is a future and should, therefore, be awaited. After the write() is acquired, simply insert() the new client into the underlyingHasMap. Once the write goes out of scope, it's dropped, and others can access the data structures again. Great! We can call the register endpoint like this:
curl -X POST 'http://localhost:8000/register' \
     -H 'Content-Type: application/json' \
-d '{ "user_id": 1 }'{
"url": "ws://127.0.0.1:8000/ws/625ac78b88e047a1bc7b3f8459702078"
}Unregistering the clients
The client with the given ID (the above-generated uuid) is simply removed from the Clients data structure. You might ask yourself, “What happens if you’re already connected via WebSockets using this ID?” They’re simply disconnected, and everything is closed and cleaned up on the side of the service.
pub async fn unregister_handler(
State(state): State<AppState>,
Path(param): Path<String>,
) -> Response<String> {
let removed = state.clients.write().unwrap().remove(¶m);
match removed {
Some(_) => Response::builder()
.status(StatusCode::OK)
.body(format!("Client removed with id {}", param))
.unwrap(),
None => Response::builder()
.status(StatusCode::NOT_FOUND)
.body(format!("Client not found with id {}", param))
.unwrap(),
}
}curl -X DELETE 'http://localhost:8000/register/625ac78b88e047a1bc7b3f8459702078'Connecting via WebSockets
Now that clients can register and unregister, it's time to let them connect to our real-time WebSocket endpoint. Let's start with the ws_handler, as show below:
pub async fn ws_handler(
    State(state): State<AppState>,
    ws: WebSocketUpgrade,
    Path(id): Path<String>,
) -> impl IntoResponse {
    let client = state.clients.read().unwrap().get(&id).cloned().unwrap();
    ws.on_upgrade(move |socket| ws::client_connection(socket, id.clone(), state, client))
}
For the given ClientId, ws.on_upgrade() is used to upgrade the connection to a WebSocket connection, where ws::client_connection function is called so, like so:
pub async fn client_connection(ws: WebSocket, id: String, state: AppState, mut client: Client) {
    let (client_ws_sender, mut client_ws_rcv) = ws.split();
    let (client_sender, client_rcv) = tokio::sync::mpsc::unbounded_channel();
    let client_rcv = UnboundedReceiverStream::new(client_rcv);
    tokio::task::spawn(client_rcv.forward(client_ws_sender).map(|result| {
        if let Err(e) = result {
            eprintln!("error sending websocket msg: {}", e);
        }
    }));
    client.sender = Some(client_sender);
    state.clients.write().unwrap().insert(id.clone(), client);
    println!("Client {} connected with sockets", id);

    while let Some(result) = client_ws_rcv.next().await {
        let msg = match result {
            Ok(msg) => msg,
            Err(e) => {
                eprintln!("error receiving ws message for id: {}): {}", id.clone(), e);
                break;
            }
        };
        client_msg(&id, msg, &state).await;
    }
    state.clients.write().unwrap().remove(&id);
    println!("{} disconnected", id);
}
This is the core part of WebSocket logic, so let's go through it slowly. The function gets a axum::ws::WebSocket passed into it by the axum::ws filter. You can loosely consider this the upgraded WebSocket connection and an synchronous Stream and Sink. The split() function of futures::StreamExt splits this up into a stream and sink, which can be cosidered a sender and a receiver.
Next, Create an tokio unbounded MPSC channel to send messages to the client. Also if you remeber the sender on the Client object, the client_sender is exactly this sender part of the channel. The next step is to spawn a tokio task in which the messages sent to the receiver part of the Client (client_rcv)